

Why So Many Twin Cities Homeowners Are Choosing High-Velocity AC for Finished Spaces
Understanding how high velocity AC is installed in a finished home is the first step toward adding real comfort without gutting your walls or sacrificing the architectural details you love.
Here is a quick overview of the process:
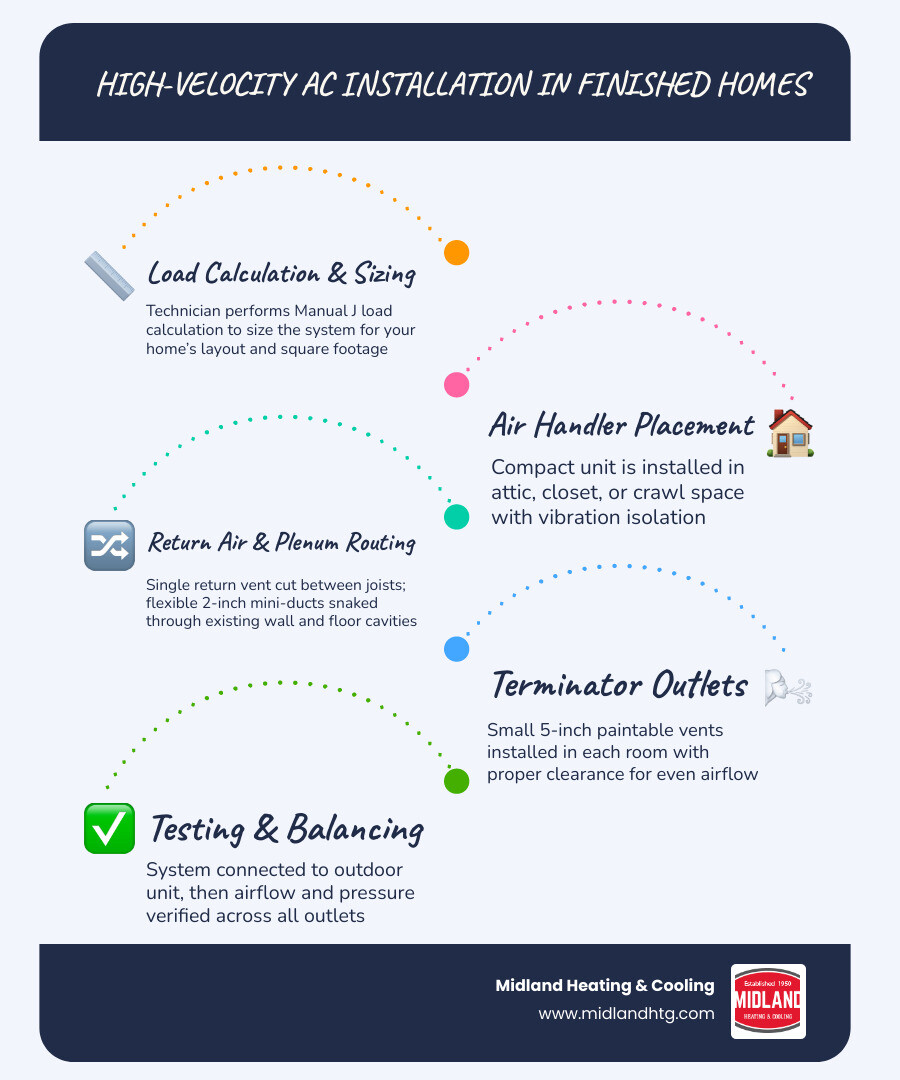
- Load calculation – A technician sizes the system for your home’s specific layout and square footage
- Air handler placement – A compact unit is installed in an attic, closet, or basement
- Return air vent cut – A single return air opening is made, typically between existing joists
- Plenum and mini-duct routing – Flexible 2-inch tubes are snaked through wall cavities, floors, and ceilings with minimal cutting
- Terminator outlet installation – Small, paintable vents are fitted into walls or ceilings in each room
- Refrigerant and electrical connections – The system is connected to an outdoor condensing unit and powered up
- Testing and balancing – Airflow and pressure are verified across all outlets before the job is done
For many Twin Cities homeowners, traditional central air simply is not an option. Older homes with plaster walls, tight attic spaces, and finished rooms on every floor leave no room for the large metal ductwork that conventional systems require. High-velocity AC solves that problem by using flexible 2-inch mini-ducts that thread through existing cavities much like electrical wiring — no dropped ceilings, no major demolition, no compromised woodwork.
The result is a whole-home cooling system that fits inside a finished home without turning it into a construction zone.
What is High-Velocity AC and Why is it Perfect for Finished Homes?
To understand how this system integrates so seamlessly into a completed living space, it helps to look at the unique physics behind it. Unlike conventional central air conditioning, which relies on high volumes of air moving slowly through massive metal trunks, high-velocity systems use a specialized process called aspiration.
Aspiration works by introducing a high-velocity stream of air into a room. As this fast-moving air exits the small outlet, it creates a gentle pressure differential that draws the surrounding room air into the stream. This mixes the air continuously, eliminating the drafty “hot spots” and “cold spots” common with standard HVAC setups.
Because these systems rely on pressure rather than sheer air volume, they utilize flexible 2-inch ducts that deliver air at nearly four times the velocity of traditional systems. This smaller footprint means high-velocity systems use less than one-third of the space in the built environment that a traditional system requires.
Additionally, because the cooling coils run consistently colder than standard systems, they can reduce in-home humidity by up to 30%. This exceptional dehumidification allows you to set your thermostat a couple of degrees warmer while feeling just as cool, saving energy in the long run.
If you are exploring your options, our specialized page on High Velocity heating and cooling explains these mechanics in even greater detail.
| Feature | High-Velocity AC Systems | Traditional Ducted Systems |
|---|---|---|
| Duct Size | 2-inch flexible insulated tubing | 6-inch round to 8×18-inch metal trunks |
| Space Required | Takes up 75% less space | Requires large bulkheads or dropped ceilings |
| Air Delivery | Nearly 4x the velocity (utilizes aspiration) | Low-velocity, high-volume gravity flow |
| Duct Energy Loss | Less than 5% energy loss | Up to 25% energy loss through leaks |
| Moisture Removal | Removes up to 30% more humidity | Standard dehumidification |
| Aesthetics | Tiny, paintable 5-inch or slotted outlets | Large, metal floor or wall grilles |
Preserving Historic Architecture in the Twin Cities
From the classic Craftsman bungalows in South Minneapolis to the stunning Victorian estates in St. Paul and Edina, our local architecture is irreplaceable. Traditional air conditioning retrofits in these homes often require building drywall bulkheads (soffits) to hide ductwork, which cuts into original plaster walls, ruins hand-carved crown molding, and lowers ceiling heights.
High-velocity systems are designed with a “preservation-first” philosophy. The flexible mini-ducts can be threaded through wall cavities, closets, and floor joists without disturbing the original lathe and plaster or beautiful wood finishes. If you want to dive deeper into protecting your home’s vintage character, read our guide on Central Air Installation in Historic Homes.
How is High Velocity AC Installed in a Finished Home to Save Space?
Because the mini-ducts require about 75% less space than conventional ductwork, we can navigate the structural framing of your home rather than forcing your home to adapt to the HVAC system.
Instead of cutting wide channels through your ceilings, we use a flexible tubing that bends around plumbing pipes, electrical wires, and structural beams. This allows us to keep the structural integrity of your home entirely intact. Before making the leap, check out our checklist on What to Know Before Converting to Central Air to ensure your home is fully prepared for the upgrade.
Key Components of a Retrofit High-Velocity System

A high-velocity system is modular and compact, consisting of three primary components engineered to fit into spaces where standard equipment simply cannot go. Knowing what these parts are helps clarify What to Expect When Upgrading to Central Air.
The Compact Air Handler and Return Air Placement
The heart of the system is a single, highly efficient cabinet blower and coil air handler. This unit is significantly smaller than a standard furnace or conventional air handler.
In a finished home retrofit, the air handler is typically installed as high as possible in the structure — such as an unconditioned attic space or a top-floor knee wall closet — to push cooled air downward naturally. It can also be tucked away in crawl spaces, basements, or utility closets.
A single, central return air box is cut into a central location (like a main hallway ceiling or floor) to pull air back to the handler. Because the system is highly pressurized, you do not need return vents in every single room, which dramatically reduces the amount of cutting required in your finished spaces.
Small-Diameter Flexible Ductwork
The air is distributed through a main plenum duct (typically 6 to 10 inches in diameter) that runs from the air handler. Branching off this plenum are the 2-inch inside-diameter flexible supply tubes.
These mini-ducts are pre-insulated and wrapped in a protective vapor barrier to prevent condensation and eliminate thermal loss. In fact, high-velocity systems lose less than 5% of their heating or cooling energy through ductwork leaks, compared to a staggering 25% energy loss common in conventional metal duct systems.
To keep the system whisper-quiet, the final few feet of each branch consist of specialized sound-attenuating tubing, which dampens the sound of the rushing air before it enters your living spaces.
Step-by-Step: How is High Velocity AC Installed in a Finished Home?
Installing a high-velocity system in an already finished home is a precise art. We treat your home with the utmost care, ensuring we plan twice and cut once. The entire Central Air Installation Process is highly organized to limit mess and maximize efficiency. Here is how we execute a professional installation step-by-step, following the industry-standard Steps Involved Professional HVAC Installation.
Step 1: Planning and Load Calculation
Before we bring a single tool into your home, we perform a detailed Manual J load calculation. This scientific assessment evaluates your home’s insulation levels, window placement, square footage, local Twin Cities climate patterns, and overall occupancy.
This calculation ensures we size the air handler perfectly. Sizing is critical: if a high-velocity system is oversized, it will cycle on and off too quickly, reducing its ability to control humidity. During this phase, we map out the exact path of the main plenum and locate the optimal spots for the 2-inch mini-duct runs, ensuring we place at least two outlets per room to guarantee balanced, draft-free airflow.
Step 2: Placing the Air Handler and Cutting the Return Air Vent
Once the plans are finalized, we install the compact air handler.
- We construct a sturdy, level platform using 2×8 stud lumber and 1/2-inch plywood in the designated attic, basement, or closet space.
- We place isolation strips or rubber vibration-absorption pads under the unit to prevent any operational hum from transferring to your home’s framing.
- We cut the single return air opening, designed to fit neatly between standard joists spaced 16 inches on center.
- We install a primary condensate drain line, pitched at a minimum of 1/4 inch per foot, and always install a secondary safety drain pan underneath the unit to protect your finished ceilings from any potential moisture overflow.
Step 3: Routing the Main Plenum and Flexible Mini-Ducts
With the air handler secured, we run the main plenum trunk line. We keep the use of elbows and tees to an absolute minimum to prevent air turbulence and pressure drops.
Next, we run the 2-inch flexible mini-ducts. We carefully snake these insulated tubes through existing wall cavities, closet corners, and floor joists. Because they are flexible, we can pull them through tight spaces much like an electrician runs wire, requiring only small, localized access points if we hit a fire block or structural obstruction. This method ensures Key Steps in Central Air Installation are completed with minimal disruption to your daily life.
Step 4: Installing and Finishing the Terminator Outlets
In each room, we use a 3 3/4-inch hole saw to cut precise openings for the room terminators (the visible vents). We place these outlets in low-traffic areas, such as room corners or alongside windows, to ensure the air streams do not blow directly onto seating areas.
To ensure a seamless finish:
- We maintain at least a 5-inch clearance from wall edges and ceilings.
- We install the terminator rough-in boots and snap the outlets into place.
- Homeowners can choose from round 5-inch faceplates or slim, slotted options.
- These terminators come in various paintable finishes and real wood stains, allowing them to blend perfectly into your existing paint colors or historic wood trim.
What to Expect During the Installation Process
When upgrading a finished home, the thought of having technicians in your space can feel daunting. However, because the mini-ducts are so small and flexible, a high-velocity system can be installed in up to 25% less time than a traditional ducted system.
For a standard 2,000-square-foot home in St. Louis Park or Bloomington, the entire process typically takes just 3 to 5 days. Our teams use drop cloths, wear protective boot covers, and clean up thoroughly at the end of each workday to keep your home livable throughout the project. For a broader look at what to prepare for, check out A Guide to HVAC Installation.
Addressing Noise and Vibration Concerns
A common question homeowners ask is: “With air moving at four times the speed of normal AC, isn’t it loud?”
The answer is no—not when installed correctly. While poorly designed systems can whistle, we prevent this by installing a minimum of 6 to 8 feet of sound-attenuating tubing at the end of every single branch run. This specialized, fabric-lined ductwork absorbs both airborne fan noise and air-friction sounds.
Additionally, we use cushioned isolation hangers every 8 feet to secure the lines, ensuring no physical vibration is transferred to your drywall or plaster ceilings. The result is a system that runs at a whisper-quiet decibel level, comparable to a soft background hum.
Heating and Cooling Versatility
High-velocity systems are not just for summer cooling. They can provide highly efficient, year-round comfort by pairing the indoor air handler with an outdoor heat pump.
During our chilly Twin Cities winters, the system can distribute warm, cozy air throughout your home. Alternatively, the air handler can be configured with a hot water coil connected to your existing boiler system, or equipped with electric strip heating. This versatility ensures that whether you live in Minnetonka, Hopkins, or Wayzata, you can enjoy efficient climate control 365 days a year.
Frequently Asked Questions About High-Velocity Retrofits
How is high velocity AC installed in a finished home without destroying plaster walls?
We use the home’s natural architectural cavities—such as stud bays, utility chases, and the spaces behind closets—to route the flexible 2-inch mini-ducts. Because the tubing can bend around obstacles, we rarely need to cut into your plaster walls. If an access hole is required to navigate a tight corner, it is typically small and easily patched, completely avoiding the need for major demolition or dropped ceilings.
How long does the installation process typically take?
For most finished homes in the Twin Cities metro area, a complete high-velocity retrofit takes between 3 and 5 days. This is roughly 25% faster than trying to construct bulkheads and run traditional sheet-metal ductwork through a finished home.
What maintenance is required after the system is installed?
To keep your system running efficiently for its full 15- to 20-year lifespan, you should:
- Replace the high-efficiency air filter every 1 to 3 months, especially during peak cooling and heating seasons.
- Keep the small room terminators free of furniture or curtain obstructions.
- Schedule an annual professional tune-up to clean the coils, check refrigerant levels, and inspect the condensate drain line.
Conclusion
Retrofitting air conditioning into a finished home does not have to mean living through a dusty, weeks-long demolition project. High-velocity HVAC systems offer a elegant, non-invasive, and incredibly efficient solution that preserves your home’s unique character while delivering modern comfort and exceptional humidity control.
At Midland Heating & Cooling, we bring over 70 years of local, family-owned service to every project. Our certified technicians specialize in handling the unique layouts of homes across Minneapolis, St. Paul, Edina, Eden Prairie, Minnetonka, Hopkins, Bloomington, Wayzata, Excelsior, and St. Louis Park.
Whether you need a new Cooling System Installation or a comprehensive HVAC Installation, we are here to help you find the perfect fit for your home.
Ready to upgrade your home’s comfort without sacrificing its style? Schedule your high-velocity AC consultation with Midland Heating & Cooling today, and let our family take care of yours!